In this page we describe how to write a very simple Driver using the INDI for Java libraries. It is assumed that you have some knowledge about the INDI Library and some Java programming experience. If you find any errors or think that any point should be clarified, please do not hesitate to contact me at zerjio AT zerjio.com.
Initial Configuration
In order to use the INDI for Java Driver library you have to download it, unzip it and locate the following two .jar files: JavaINDIDriver.jar and JavaINDI.jar. Both files can be found in the dist directory. You will need to include both files in your classpath. If you are using a IDE (like NetBeans), you will have to include them as needed libraries for your project. Please refer to your IDE documentation on how to do this if you are unfamiliar with using 3rd party libraries.
Example Driver Description
We are going to develop a very simple INDI Driver called INDIDriverExample. It will have just three different properties:
- The first one will consist on the usual
CONNECTIONproperty (aSwitchone). As you will see, providing this standard Property is a quite easy with the INDI for Java Driver library. - The second one will consist on a
Switchproperty calledsendImagewith just one element. This will allow to use it just as a trigger to request an image. - The third one will consist on a
BLOBproperty calledimagewhich will contain some image binary data and that will be sent to the client once it is requested (using thesendImageproperty.
Creating the INDI Driver
Every INDI Driver developed with the INDI for Java Driver is a class that extends the laazotea.indi.driver.INDIDriver class:
import laazotea.indi.Constants.*;
import laazotea.indi.INDIBLOBValue;
import laazotea.indi.driver.*;

public class INDIDriverExample extends INDIDriver implements INDIConnectionHandler {

  ...

}
Also note that the class implements INDIConnectionHandler. This will allow to easily define and use the standard CONNECTION Property. In fact, once the Driver is set to implement the methods in INDIConnectionHandler it automatically adds the Property and its elements, requiring no additional programming (apart from the specific connection and disconnetion code that we will show in the following).
As the INDIDriver class is abstract, we have to implement several methods. One of the most important ones is the getName() method:
  // Returns the name of the Driver
  @Override
  public String getName() {
    return "INDI Driver Example";
  }
In the class constructor we will usually initialize the Properties and Elements that will be available in our driver:
  // The Properties and Elements of this Driver
  private INDIBLOBProperty imageP;
  private INDIBLOBElement imageE;
  private INDISwitchProperty sendP;
  private INDISwitchElement sendE;

  public INDIDriverExample(InputStream inputStream, OutputStream outputStream) {
    super(inputStream, outputStream);

    // Define the BLOB Property with this Driver as its owner, name "image", label "Image", group "Image Properties", initial state IDLE and Read Only.
    imageP = new INDIBLOBProperty(this, "image", "Image", "Image Properties", PropertyStates.IDLE, PropertyPermissions.RO);
    // Define the BLOB Element with name "image" and label "Image". Its initial value is empty.
    imageE = new INDIBLOBElement(imageP, "image", "Image");

    // Define the Switch Property with this driver as its owner, name "sendImage", label "Send Image", group "Image Properties", initial state IDLE, Read/Write permission and AtMostOne rule for the switch.
    sendP = new INDISwitchProperty(this, "sendImage", "Send Image", "Image Properties", PropertyStates.IDLE, PropertyPermissions.RW, SwitchRules.AT_MOST_ONE);
    // Define the Switch Element with name "sendImage", label "Send Image" and initial status OFF
    sendE = new INDISwitchElement(sendP, "sendImage", "Send Image", SwitchStatus.OFF);
  }
Note that the INDIDriver constructor needs an InputStream and OutputStream from where the messages will be sent and received. Those streams will usually be the standard input and output, but it is not the drivers task to control that. That is why we use
super(inputStream, outputStream);
as the first action in the constructor.
The next lines just create the rest of Properties and Elements. Please note that when creating an Element you specify its owner Property. Thus, it is not necessary to explicitly add the Elements to the Property.
Now is time to add the created Properties to the Driver. We will do this when the Client ask the device to be connected (via the CONNECTION Property). As we previously mentioned our driver implements INDIConnectionHandler which is composed of the following methods:
  // Add the image and send properties changes
  @Override
  public void driverConnect(Date timestamp) {
    printMessage("Driver connect");
    this.addProperty(imageP);
    this.addProperty(sendP);
  }

  // Remove the image and send properties changes
  @Override
  public void driverDisconnect(Date timestamp) {
    printMessage("Driver disconnect");
    this.removeProperty(imageP);
    this.removeProperty(sendP);
  }
Note that when the Client asks for the disconnection of the Driver the properties will be removed.
Dealing with Changes in the Properties
We are almost finishing our example. In fact, the only thing to do is to parse the Client requests to change the Property values. To do so we must implement the following 4 methods (one for each kind of Property except from Light ones that cannot be changed at the client side):
      // No Number Properties can be set by clients. Empty method
      @Override
      public void processNewNumberValue(INDINumberProperty property, Date timestamp, INDINumberElementAndValue[] elementsAndValues) {
      }
      // No BLOB Properties can be set by clients. Empty method
      @Override
      public void processNewBLOBValue(INDIBLOBProperty property, Date timestamp, INDIBLOBElementAndValue[] elementsAndValues) {
      }
      // No Text Properties can be set by clients. Empty method
      @Override
      public void processNewTextValue(INDITextProperty property, Date timestamp, INDITextElementAndValue[] elementsAndValues) {
      }
      // Processes the changes sent by the client to the Switch Properties. If the Switch property is the CONNECTION one it adds or removes the image and send Properties. If the Property is the "sendImage", it loads an image from disk, sets it to the image property and sends it back to the client.
      @Override
      public void processNewSwitchValue(INDISwitchProperty property, Date timestamp, INDISwitchElementAndValue[] elementsAndValues) {
        if (property == sendP) {  // If the property is the sendImage one
          if (elementsAndValues.length > 0) {  // If any element has been updated
            INDISwitchElement el = elementsAndValues[0].getElement();
            SwitchStatus s = elementsAndValues[0].getValue();
            if ((el == sendE) && (s == SwitchStatus.ON)) {  // If the sendImage element has been switched one we send the image
              boolean imageLoaded = loadImageFromFile();
              if (imageLoaded) {
                sendP.setState(PropertyStates.OK);  // Set the state of the sendImage property as OK
                updateProperty(sendP); // Send the sendImage property to the client.
                imageP.setState(PropertyStates.OK); // Set the state of the image property as OK
                updateProperty(imageP); // Send the image property to the client.
              }
            }
          }
        }
      }
The first three methods are empty as there are no properties of that kind that can be changed by the Client. In fact, only the SEND property can be changed. As it is a Switch property, we deal with its changes in the processNewSwitchValue(...) method.
These methods have 3 arguments: property which is the property which is asked to change its values, timestamp which is the date and time in which the change request has been made and the elementsAndValues which is an array of all the elements and their requested values asked by the Client.
If you study the code you'll notice that much of it is just ensuring that the selected property and elements are the desired ones. This is of major importance when the Driver has a greater amount of properties.
The function loadImageFromFile() just loads a image (the one to be sent) from the hard disk into the BLOB Property:
  // Loads the image "image.jpg" from the same directory into the image property. Returns true if the loading has been succesful. false otherwise.
  private boolean loadImageFromFile() {
    if (imageE.getValue().getSize() == 0) { // If it has not been already loaded

      byte[] fileContents;

 ...
      // CODE TO DEAL WITH THE LOADING OF THE FILE, CHECK BELOW IF INTERESTED
 ...

      // Create the new BLOB value and set it to the image element.
      INDIBLOBValue v = new INDIBLOBValue(fileContents, ".jpg");

      imageE.setValue(v);
    }

    return true;
  }
Finally, note that the code
            sendP.setState(PropertyStates.OK);  // Set the state of the sendImage property as OK
            updateProperty(sendP); // Send the sendImage property to the client.

            imageP.setState(PropertyStates.OK); // Set the state of the image property as OK
            updateProperty(imageP); // Send the image property to the client.
is the one responsible of sending the updated properties to the Client. It is the Driver responsibility of updating the state of any involved property and of sending the new values.
Running and Testing the Driver
Now the code of our simple Driver is complete... so it is time to test it!
To do so we will need two follow two steps. The first one is to run the driver and the second one is to use some INDI Client to use it:
Launching the Driver
We will make use of the indiserver application (provided by the standard INDI Library). Please note that once the INDI for Java Server Library is completed this step will be certainly changed.
At this point we face a little problem: the indiserver application does not allow to launch programs with parameters. We will solve this problem by creating a small bash script called launch.sh. That bash script will consist only in the launch command for the application. In our case, its contents are:
#!/bin/bash
java -cp INDIDriverExample.jar:JavaINDIDriver.jar:JavaINDI.jar laazotea.indi.driver.INDIDriverRunner INDIDriverExample
Please note that we are assuming that the three files INDIDriverExample.jar, JavaINDIDriver.jar and JavaINDI.jar are in the same directory as the launch.sh. The INDIDriverExample.jar is the compiled code of our driver. Please ensure that the launch.sh file has execution privileges (try chmod 755 launch.sh if not).
At this point we can launch the program with the following command:
$ indiserver ./launch.sh
If everything is right you'll see a message similar to:
2012-03-26T19:47:38: startup: indiserver ./launch.sh
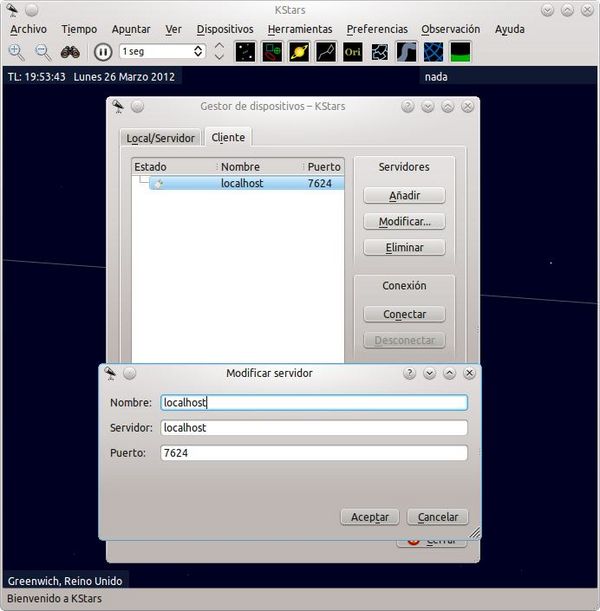
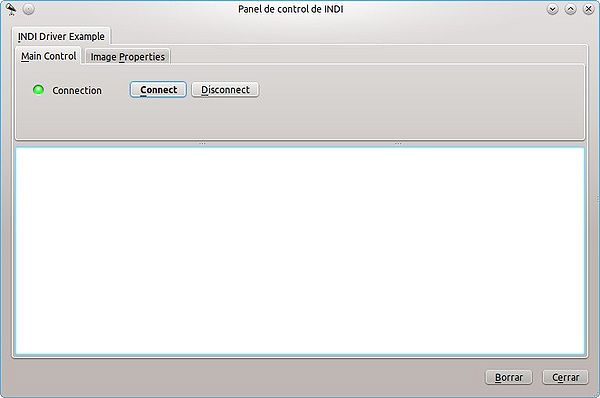
Using a INDI Client to Test It
Open your favourite INDI Client (for example KStars), connect to your same machine in the standard INDI port (7624) and try to use it!. I'm sorry but the following images are in Spanish, but I think they can be clearly understood.