
Maybe as an "easy" fix you can attach your SSD to USB1?
This is the process I followed.
So first I updated everything:
sudo apt update
sudo apt full-upgrade
sudo rpi-update
Then a reboot:
sudo reboot
Then an update of the bootloader:
sudo rpi-eeprom-update -d -a
Then a reboot:
sudo reboot
Now I am ready to change the boot order. For this I use the raspi-config utility:
sudo raspi-config
Select Boot Options
Select Boot ROM version
Select Latest then press OK
Choose No to Reset boot ROM to defaults
Select OK to end this section
Now we are sure we are using the latest boot ROM.
Next we are going to change the boot order.
Select Boot Order
Choose USB boot first, OK.
Do not reboot!
Now use the SD card copier (make sure your USB SSD drive is attached to a USB 3 port) and copy from the SD card to the USB drive.
This step deletes everything on your USB SSD
Now you can reboot and the RPI should boot from the USB (if the USB drive is not attached it will boot from the SD card).
sudo reboot
This process will have created a boot (/boot) partition and a root (/) partition on the SSD. The root partition will be the size of the whole remaining disk. If you want to make a backup from time to time this is not handy as it will take an age to copy and you will need a lot of storage (another SSD just as big) to make a backup. To solve this we need to shrink the root (/) partition. I used a tool called GParted. To install and run it do the following:
sudo apt-get install -y gparted
Now it gets a bit messy because we want to modify the partition we are currently using and that is not possible. So you must shutdown the RPi, disconnect the USB SSD drive and reboot, this will boot from the SD card (makes a nice check to ensure that still works as a backup). Once rebooted you can connect the USB SSD again.
Now start the partitioning tool:
sudo gparted (or select it from the System Tools menu)
Select the SSD drive in the dialog box on the right had side. It should be something like /dev/sda
In the partition table you should see:
/dev/sda1 and /dev/sda2. /dev/sda1 is the boot partion which we will leave alone. We are interested in /dev/sda2
Select /dev/sda2
Right mouse click and select "Unmount" (otherwise we can't change it).
Right mouse click and select "Resize/Move". I made mine 60GB.
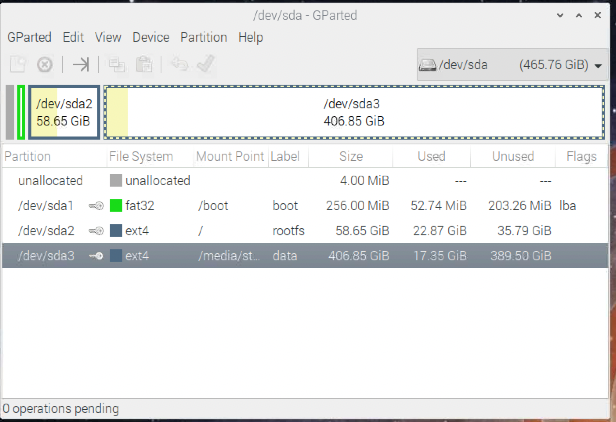
Once this is done there will be free space available. From the Partition menu choose "New". The default is that it will use all the remaining disk. Give it a label (I called my "data") and select OK. Now you have everything ready to change the partition (nothing has actually happed yet). You will see a green check box just under the menu, when you are confident everything is OK press the green check mark. Now the actual changes will be made.
You should now have something that looks a little like this:
Maybe as an "easy" fix you can attach your SSD to USB1?
This is the process I followed.
So first I updated everything:
sudo apt update
sudo apt full-upgrade
sudo rpi-update
Then a reboot:
sudo reboot
Then an update of the bootloader:
sudo rpi-eeprom-update -d -a
Then a reboot:
sudo reboot
Now I am ready to change the boot order. For this I use the raspi-config utility:
sudo raspi-config
Select Boot Options
Select Boot ROM version
Select Latest then press OK
Choose No to Reset boot ROM to defaults
Select OK to end this section
Now we are sure we are using the latest boot ROM.
Next we are going to change the boot order.
Select Boot Order
Choose USB boot first, OK.
Do not reboot!
Now use the SD card copier (make sure your USB SSD drive is attached to a USB 3 port) and copy from the SD card to the USB drive.
This step deletes everything on your USB SSD
Now you can reboot and the RPI should boot from the USB (if the USB drive is not attached it will boot from the SD card).
sudo reboot
This process will have created a boot (/boot) partition and a root (/) partition on the SSD. The root partition will be the size of the whole remaining disk. If you want to make a backup from time to time this is not handy as it will take an age to copy and you will need a lot of storage (another SSD just as big) to make a backup. To solve this we need to shrink the root (/) partition. I used a tool called GParted. To install and run it do the following:
sudo apt-get install -y gparted
Now it gets a bit messy because we want to modify the partition we are currently using and that is not possible. So you must shutdown the RPi, disconnect the USB SSD drive and reboot, this will boot from the SD card (makes a nice check to ensure that still works as a backup). Once rebooted you can connect the USB SSD again.
Now start the partitioning tool:
sudo gparted (or select it from the System Tools menu)
Select the SSD drive in the dialog box on the right had side. It should be something like /dev/sda
In the partition table you should see:
/dev/sda1 and /dev/sda2. /dev/sda1 is the boot partion which we will leave alone. We are interested in /dev/sda2
Select /dev/sda2
Right mouse click and select "Unmount" (otherwise we can't change it).
Right mouse click and select "Resize/Move". I made mine 60GB.
Once this is done there will be free space available. From the Partition menu choose "New". The default is that it will use all the remaining disk. Give it a label (I called my "data") and select OK. Now you have everything ready to change the partition (nothing has actually happed yet). You will see a green check box just under the menu, when you are confident everything is OK press the green check mark. Now the actual changes will be made.
You should now have something that looks a little like this:
Reboot with the SSD attached and you should be done!
Have to start work now. I will explain how I moved the Pictures folder this evening.
Now I have written down all the steps I realise it's maybe not for the faint hearted (those of you who are not linux geeks) but I hope it will help.
Read More...